

How To Draw A Repeating Pattern
Illustrator How to Make a Design that Repeats Seamlessly
I of the many powerful aids to illustration in Adobe Illustrator is the facility to create and use repeating patterns. Patterns tin save a huge amount of both time and processing power - without them we'd be stepping and repeating objects until the cows came dwelling.
Illustrator: How to Make a Pattern - Tutorial by Nick Beresford Davies
Lots of designers steer clear of patterns for a couple of reasons. Until Adobe Illustrator CS6, existing pattern swatches were un-editable and inflexible. If y'all didn't like the pattern swatches provided, yous'd have to either create your ain or flatten the transparency of an object filled with a blueprint swatch, aggrandize its attributes and manually edit the resulting artwork.
The second reason for avoiding them has been that if you did create your own repeating design, one time it was in the swatches palette, information technology also became inflexible and united nations-editable. This has been changed in Illustrator CS6 - there's now a new Pattern Options control panel that allows infinitely more control over both existing and custom patterns.
The purpose of this tutorial is to explain in Illustrator how to make a blueprint, whether you're using Illustrator CS5 (or earlier) or Illustrator CS6. The process of designing and creating a pattern is the aforementioned for both earlier versions as well as CS6. Only later on the pattern has been 'defined' do you encounter noticeable differences in the way that Illustrator CS6 handles the pattern swatch.
Lets create the pattern blueprint first though.
CS5 and CS6 Illustrator How to Make a Design
In the Swatches Palette of Illustrator you lot'll find three distinct swatch types. These are:
- Color Swatches
- Gradient Swatches
- Pattern Swatches
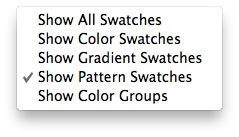
We'll be focusing on the Blueprint Swatches. To access them select Window/Swatches. With the Swatches palette open, click the small "Evidence Swatch Kinds bill of fare" at the lesser. From the popup menu, select "Show Blueprint Swatches".
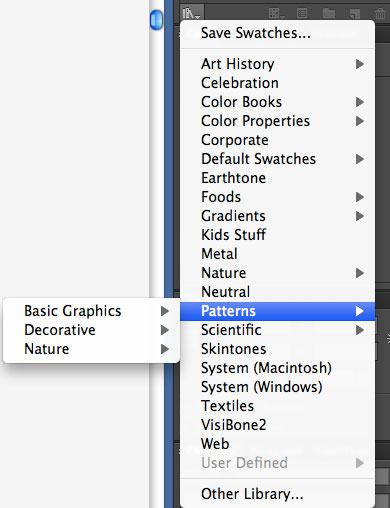
To test any swatch presets, create a new document and employ the Rectangle Tool to create a box to fill. Click on the "Swatch Libraries menu" to reveal a long listing of colour, slope and pattern swatches. Roll over the Patterns option and you'll find Bones Graphic patterns, Decorative patterns and Nature patterns. Cull any of these to make full the rectangle and you lot'll come across the pattern in activeness.
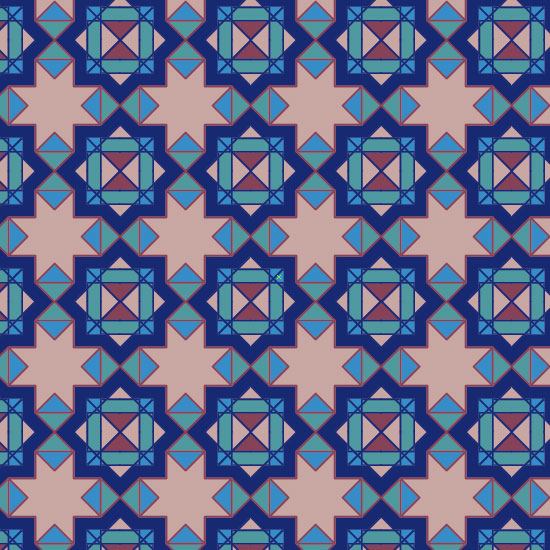
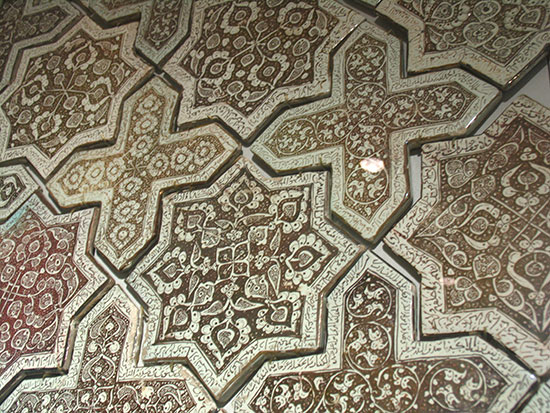
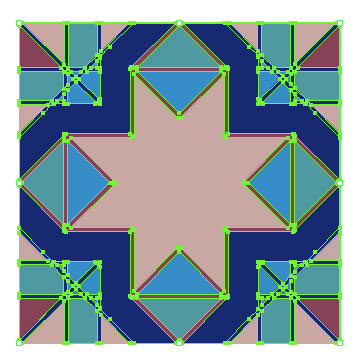
For the purposes of this tutorial I'd like to create a new blueprint that was influenced by a traditional Islamic star and cantankerous ceramic mosaic I saw recently at the British Museum:
Before getting started though, permit's create a random, elementary pattern simply to give y'all a quick and muddy idea how patterns piece of work in Illustrator.
Create a random pattern in Illustrator
Quickly create a number of random shapes filled with random colors. Select the whole grouping and select Edit/Ascertain Pattern. A dialogue window will announced requesting a proper name for the new pattern - give information technology a proper name of your choice. Click OK. You tin can now delete the original group of objects.
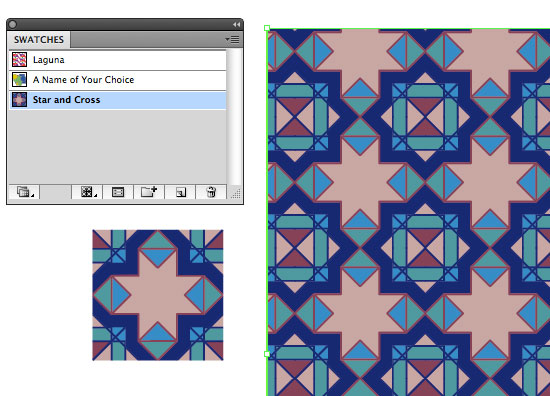
At present when you look in the Design Swatches window you'll see a new swatch - the one you lot only created. Make a new rectangle using the Rectangle Tool and fill it with the new pattern by ensuring that "Fill up" (as opposed to "Stroke") is selected at the lesser of the Tool Bar and clicking on the new blueprint swatch.
That's pretty much all there is to information technology in Illustrator CS5 and before. If you lot wanted to edit the pattern within the filled shape, you'd need to select the rectangle and choose Object/Expand. You'd and then exist able to select individual items within the design and tweak them. What I actually want to do though is create a seamless, repeating pattern - like the one at the top of the page.
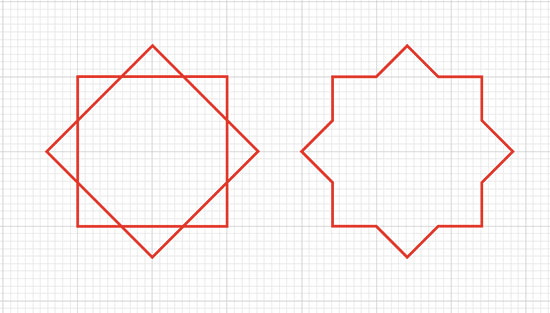
All Illustrator repeating patterns are made up of tiles. The simplest way to create a pattern is to have the tiles square or rectangular in shape, so that they can butt upwardly against each other without leaving whatever space or gaps inbetween each other. When we created the random design above, in that location was infinite around each instance of the tile - because the blueprint generator was creating its own squares to render the pattern.
In order to create a new pattern, the first step is to create a design. The second step is to identify a square or rectangular expanse that will be repeated - and ingather everything else out. The third footstep will be to ascertain the pattern swatch itself.
Illustrator How to Make a Pattern
Pace one: Create a Design Design
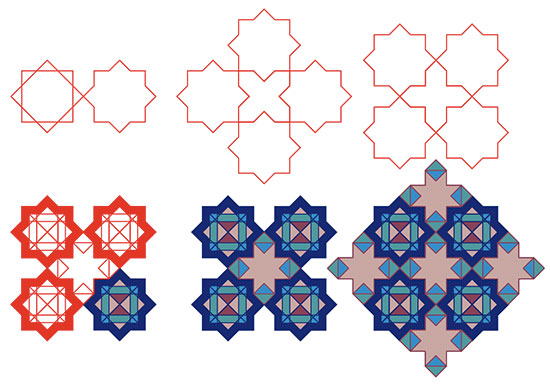
The pattern I created for this article was fairly simple to put together. If you written report it you lot'll see that information technology's just made up of lots of squares laid over each other, half of which are rotated by 45°. I used a grid to create the squares and just kept creating more on new layers with different make full colors until I was happy with the consequence.
As a guide, I found a sketch that broke down the bones shapes of the star and cross blueprint (run across source below):
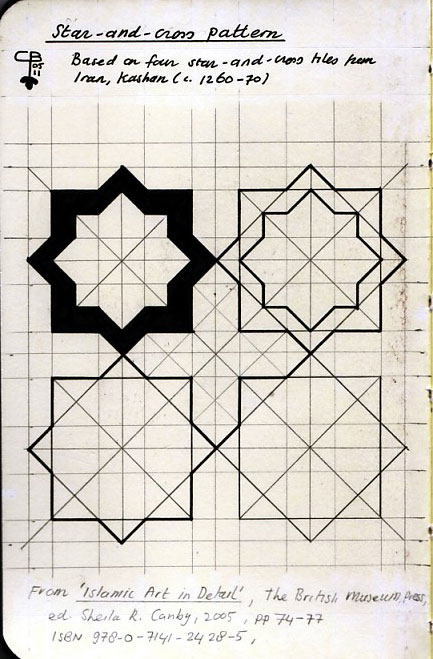
Source: © D0zyD0g
And so using a combination of the Rectangle Tool, Rotate Tool and 'Unite' option in the Pathfinder palette, I congenital the blueprint up. Once you go to the final stage, when you lot can manually built the pattern upwardly by copying and placing the repeating elements, you demand to get information technology to a point where you tin create a repeating tile.
Illustrator How to Brand a Pattern
Footstep 2: Create a Repeating Tile Using the Crop Tool
How to remove areas outside outside a clipping mask
Commonly when masking a specific surface area of a design I would use the Object/Clipping Mask tool. The best reason for using this is that you tin always remove the mask afterwards, or piece of work inside it to adjust its content. In other words, it's a non-destructive way of working.
Withal, if you lot use a clipping mask to create a pattern tile, when you define the pattern, everything hidden by the clipping mask will exist included in the swatch, thus leaving you lot with lots of unwanted white space. What you really desire to do is completely erase everything outside the clipping mask.
The way to do this is not to apply the clipping mask at all. Instead use the Ingather button in the Pathfinder palette.
Use the Crop Tool to delete everything exterior the mask
Earlier y'all employ the Crop Tool, brand a duplicate of the whole pattern (so that you lot can retain the original) and catechumen all strokes to outlines: Object/Path/Outline Stroke. This is an of import stage because the Pathfinder 'Crop' tool won't practice its job properly if there are any strokes in the design.
Afterwards you've done this, grouping the elements of the pattern and create a square (or a rectangle) over the superlative. Calibration and position it precisely where the corners of the repeating tile will be.
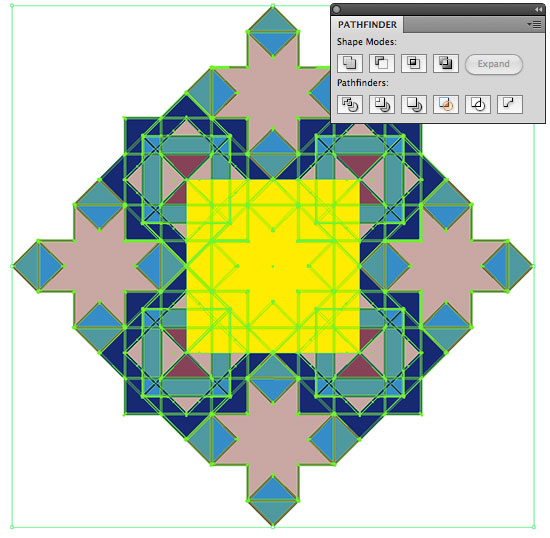
Now instead of using the Clipping Mask Tool, with the pattern group and square selected, click the 'Crop' button in the Pathfinder. This will completely remove (non only hide) the areas of the pattern exterior the repeating tile.
Up to this point the process of creating the blueprint design has been pretty much identical for both Illustrator CS5 and CS6. This is where they part ways, however.
Illustrator How to Brand a Blueprint
Step 3a: How to Ascertain a Design in Illustrator CS5 (or earlier)
Now comes the moment when we add the new tile to our Pattern Swatch palette. Only select the tile and choose Edit/Define Pattern... A window volition open up giving you the opportunity to name your new blueprint swatch. Proper name it, click OK and you'll encounter the new swatch appear in the Pattern Swatches palette. Now y'all tin create a shape and fill it with a (hopefully) perfect repeating blueprint.
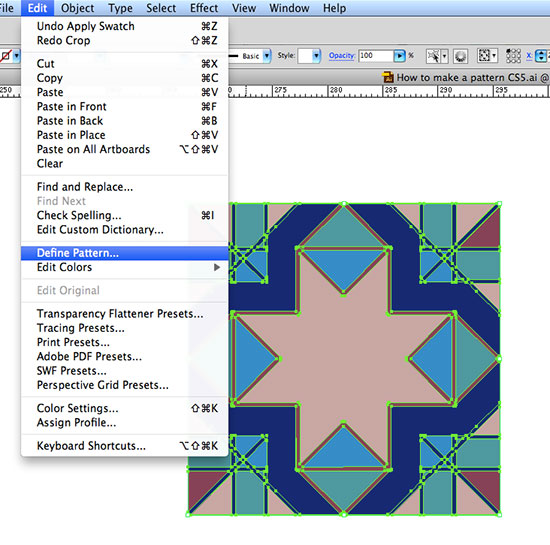
That'south it for Illustrator CS5 (and earlier versions). If you want to edit the pattern or get it to tile in a different way, you'll have to go dorsum a few stages and redefine the blueprint. Alternatively you can select Object/Expand with the filled item selected. This volition break the blueprint upwards into an editable design, although you lot'll only be able to make edits to specific areas of the design - your edits won't be carried over to the remainder of the pattern pattern.
Illustrator How to Make a Design
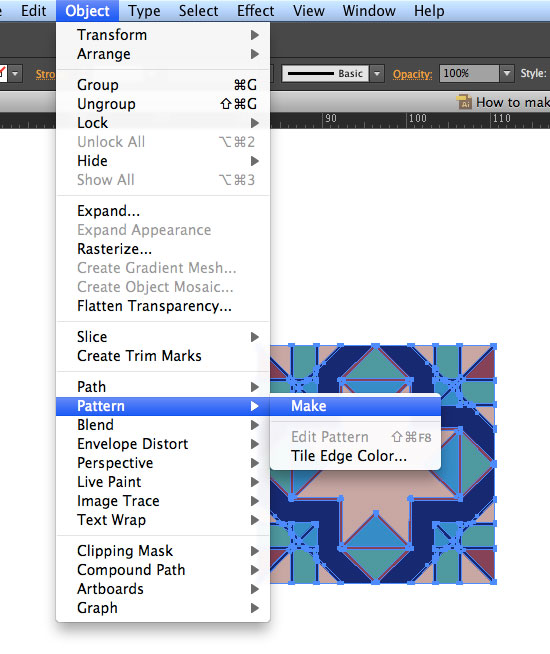
Step 3b: How to Define a Pattern in Illustrator CS6
To define the pattern in CS6, select the tile you only created and choose Object/Pattern/Make. A window will appear that says:
The new design has been added to the Swatches console. Whatever changes made while in Blueprint Editing Style will exist practical to the swatch upon leave.
Design Editing Manner? Cool! Finally a way to edit a pattern subsequently it'due south been created. Next to the window (you lot tin can click OK now) you'll encounter a make new control panel chosen Pattern Options. You'll too detect that around your tile the pattern has repeated itself with reduced opacity so that you can preview what the design will await similar when applied.

Play around with the settings in Pattern Options. You tin now adjust the way the tiles barrel up against each other (see the options under Tile Blazon), alter the space between the tiles, dictate how many tiles you want in the blueprint and and so on.
This means that yous're non necessarily tied down to rectangles and squares if you desire to create a seamless tile. If you lot examine on the the preset patterns that ship with Illustrator CS6, you'll encounter what I mean. Requite 1 of them a endeavor. Select Window/Swatch Libraries/Patterns/Nature/Nature_Foliage and click in one case on the "Leaves Tropical Color" swatch. An instance of this swatch will now announced in your Pattern Swatches palette. Double click this new swatch and the Pattern Options editing manner will open.
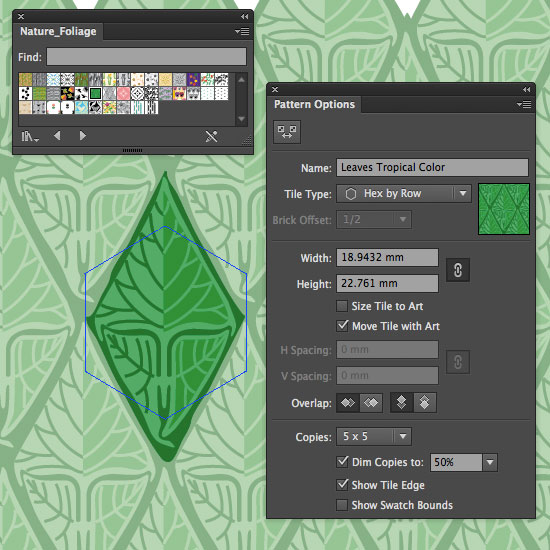
On this swatch you lot'll run across that the design tile isn't divisional by a square - this time it's a hexagon. In Blueprint Options the Tile Type is "Hex by Row". If you change the Tile Type to "Brick by Row" and the width & height to 17.5mm each, the result is much the same. Play with these settings a little more and you'll see how much command you now have over the design.
Have fun!
Download royalty free vector graphics - Vector Packs from VectorVice
Resources & More Data
- Royalty Complimentary Vector Packs
- Illustrator Live Trace
- Illustrator How to Create a Logo
- Illustrator How to Convert Text to Outlines
- Illustrator How to Create Line Art
- Click to go to peak of Illustrator How to Make a Pattern


Source: https://www.graphic-design-employment.com/illustrator-how-to-make-a-pattern.html
Posted by: baileyrectelon.blogspot.com
0 Response to "How To Draw A Repeating Pattern"
Post a Comment